Mostrando entradas con la etiqueta Java. Mostrar todas las entradas

domingo, 4 de enero de 2015

Add a JAVA applet in a PeopleSoft Page


A JAVA applet is a set of related classes and compiled into a ".jar" file. This file is able to be run through an HTML object.

In PeopleSoft we cun add these programs in our pages through some easy steps.

Let's see an example:
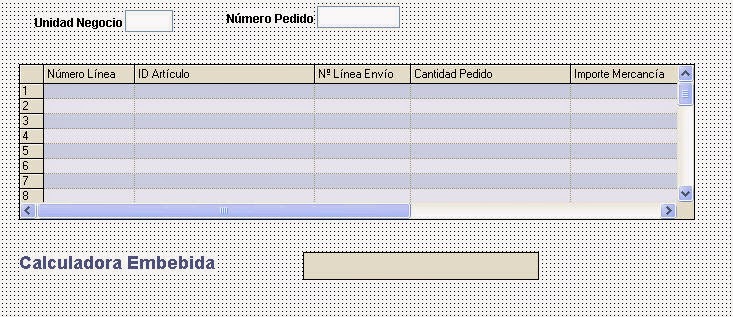
For instance, we have a page where we can see a purchase order's lines. We want to show a calculator in case any user wants to make some calculations based on the numbers in the page.


1) Place the ".jar" applet file in a public folder of the Web Server. We need this folder to be public since users must have access to the file.
For instance, we can place the file in the folder were the "Signon.html" file is placed.
Generally the path is:
//server/PS_HOME/WEBSERVER/BASE/application/peoplesoft/PORTAL/portalName


2) Add a HTMLAREA field in the page where we want to show the Embedded Calculator.


3) Create an HTML object. It will be used to populate the area in the page.
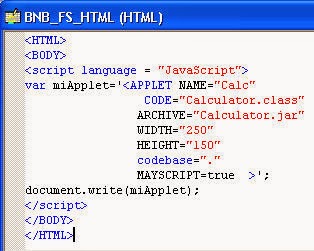


We are interested on the following parameters of this file:
NAME:Applet's name.
CODE: Path and name of the applet's main class.
ARCHIVE: Name and extension of the JAR file we left in the WebServer.
WIDTH: of the applet (pixels)
HEIGHT: of the applet (pixels)
CODEBASE: Here we should detail the path where the file is placed. Since we left it in the same folder as the singon.html file we only need to set the dot character "." as a parameter. With this reference we tell the system the file is in the same path.

Then we use the "document.write()" method to write the applet in the HMTL.

Note: Line breaks were only added to be shown in the explanation of the parameters. In the HTML object the applet must be written in the same line, so the final quote is recognized and the string is closed.


4) Populate the HTMLAREA field in the Activate event of the Page.


5) Finally, the result is as follows:


I hope this blog could be so useful to you as it is to  me.
Regards.
Facundo Salerno.

Agregar un applet de JAVA en una página PeopleSoft


Un applet de JAVA es un conjunto de clases relacionadas y compiladas en un archivo con extensión ".jar" que se puede ejecutar desde un HTML. 
En PeopleSoft podemos usar estos programas desde nuestras páginas, mediante unos simples pasos.

Vamos a verlo en un Ejemplo Práctico. 
Por ejemplo, tenemos una página donde se muestran las líneas de un pedido, y queremos insertar una calculadora para que el usuario pueda hacer cuentas en base a los números en pantalla.


Los pasos serían:

1) Ubicar el archivo .jar del applet en una carpeta del servidor Web que tenga acceso público. Esto es porque los distintos navegadores de los usuarios van a tener que poder acceder a dicho archivo.
Por ejemplo podemos dejarlos en el directorio del WebServer donde se encuentra el archivo signon.html 

Generalmente la ruta es: //servidor/PS_HOME/WEBSERVER/BASE/application/peoplesoft/PORTAL/nombrePortal

Ejemplo:


2) Agregar un área HTML en la página donde queremos visualizar el applet.


3) Crear un objeto HTML, que será el que se mostrará en la página.


De este archivo nos interesan los siguientes parámetros:
NAME: Nombre para el Applet.
CODE: Dirección donde está la clase principal del applet.
ARCHIVE: Es el archivo JAR que dejamos en el servidor.
WIDTH: Ancho del applet (en pixeles).
HEIGHT: Alto del applet (en pixeles).
CODEBASE: Aquí debe ir la ruta donde debe buscar el archivo. Como la dejamos en la misma carpeta del signon.html, basta con pasarle un caracter punto "." como parámetro, haciendo referencia a que el archivo JAR está en la misma dirección.

Con el método "document.write()" escribiremos en el HTML el applet.

NOTA: Los saltos de línea fueron agregados para la explicación, pero en el objeto HTML el applet debe ir todo en la misma línea, para que reconozca la comilla simple al final de la línea y cierre el "string".

4) En el evento Activate de la página populamos el campo HTMLAREA con nuestro script.


5) Finalmente, al entrar a nuestra página, el resultado será el siguiente:


Espero que este simple paso a paso les resulte útil como a mí.

Saludos.
Facundo Salerno.