domingo, 15 de marzo de 2015

IN - Static Replenish

Hi All,

I'm afraid of boring you with so many technical things, so let's have a functional tutorial today.

Working in BNB I have learnt about Inventory Process.

One of the main process I have seen is the Replenishment Process.

There are different ways of items replenishment. Here you will find a quick explanation about the static one.

1) First of all we have to create a new Replenishment Class.


2) In order to set a static Replenishment we must set the Item attributes.
For instance,  let's take the USA-01 item in the US0003 business unit.

If we check the inventory status of this item, we'll see there are 3000 units available.


Let's go to Root > Inventory > Replenish Inventory > Setup Item Replenishment

We should set some additional values:
Reorder Quantity Option: Static Reorder QTY
Replenish Class: STAT (the one we had created)
Reorder Point: 3001. (meaning when we have less than 3001 units of the item it will be included in the replenishment process)
Reorder Quantity: 4000 (how many units of the item should be ordered). This quantity can't be lower than the Reorder Point.
Why? Think you have 0 items in your inventory and  you set the reorder quantity to 1000.
Once the Replenishment Process is executed, you buy the 1000 units, but this item is still below the reorder point that is 3001. So the system won't let you be at this situation.


3) Now we must set the business unit replenish options: Let's go to  Root > Inventory > Replenish Inventory > Setup Replenishment


4) Having this configuration set up let's run the replenishment process, chossing BU = US003 and replenish class = STAT.

 Root > Inventory > Replenish Inventory > Create Replenishment Request


5) Let's check process status in the Process Monitor Page


6) We now go to the "Manage Replenishment Request" page and we could see recently created  Replenishment ID.
As we could see in the following screen the item is shown with 4000 units to be bought.
If we need to change the quantity we'll be able to do it in this page.


7) We are now able to execute the Requisition Loader, choosing the Replenish ID we have previously created.


8)  If we check the process monitor, we could see the ID of the requisition that was created


9) And, as the final step, we check the requisition was properly created.


I hope this blog could be so useful to you as it is to me.

Regards.
Facundo Salerno.


sábado, 7 de marzo de 2015

Sending Mails through PeopleSoft -> Bye SendMail()

Hi!

Since Tools 8.52 SendMail() has been deprecated. It was replaced by a more powerful application class PT_MCF_MAIL:MCFOutboundEmail 

As I have not seen it used frequently I decided to write this post, both for having it always in mind and for letting anyone know about it.

Here you have a practical way of using it.

1) We import the Application Class

import PT_MCF_MAIL:MCFOutboundEmail ;

2) We instantiate an object of this class

 Local PT_MCF_MAIL:MCFOutboundEmail &eMail = create PT_MCF_MAIL:MCFOutboundEmail();

3) We fill all the mail sections in the following way.

   &eMail.From = "mailFrom@server.com" ;
   &eMail.Recipients = "target1@server.com ;target2@server.com ;target3@server.com" ;
   &eMail.Subject = "This is the subject of the mail";
   &eMail.Text = "This is the content of the mail";
   
4) In case we need to attach any file, we have the AddAttachment method 
And an easy way of using it coudl be:
   &eMail.AddAttachment( &AttachmentPath+  &AttachmentNameWithExtension , %FilePath_Absolute | %FilePath_Relative, &AttachmentNameWithExtension, "Attachment Description" , "", "");
   
5) As Send method  has a return value, we have 2 possibly ways of sending the mail.
  • If &eMail.Send() = %ObEmail_Delivered then
  • Local integer &i_ret = &eMail.Send();

If method returns a "1" value, everything works as expected. Otherwise, we should check it!

Numeric Value
Constant Value
Description
0
%ObEmail_ FailedBeforeSending
Email failed before being sent.
1
%ObEmail_Delivered
Email was delivered.
2
%ObEmail_NotDelivered
Email delivery not attempted.
3
%ObEmail_PartiallyDelivered
Email has only been partially delivered. Only some
of the addresses in the list of addresses were delivered to.
-1
%ObEmail_ SentButResultUnknown
Email was sent but whether it was successful or not is not known.
For further details, we can just check PeopleBooks at the following link:
http://docs.oracle.com/cd/E41633_01/pt853pbh1/eng/pt/tpcr/task_MCFOutboundEmailClass-f451c6.html

I hope this blog could be so useful to you as it is to me.

Regards.
Facundo Salerno.

Mandar mails desde PeopleSoft -> Chau SendMail()

Hola!

A partir de las tools 8.52 la función SendMail() ha sido considerada obsoleta, y fue reemplazada por una herramienta mas potente: La clase PT_MCF_MAIL:MCFOutboundEmail 

Como todavía no la encuentro muy utilizada decidí hacer este post, tanto para tenerlo siempre presente, como para cualquier curioso que todavía no la conozca.

Acá va una forma rápida de usarla:

1) Importamos la clase:

import PT_MCF_MAIL:MCFOutboundEmail ;

2) Instanciamos un objeto de la misma

 Local PT_MCF_MAIL:MCFOutboundEmail &eMail = create PT_MCF_MAIL:MCFOutboundEmail();

3) Agregamos los datos necesarios de la siguiente manera

   &eMail.From = "miCorreo@servidor.com" ;
   &eMail.Subject = "Este es el asunto del mail";
   &eMail.Text = "Este sería el texto del cuerpo del mail";
   
4) Si precisamos agregar adjuntos, tenemos el método AddAttachment
Y una breve forma de usarlo sería
   &eMail.AddAttachment( &rutaAdjunto +  &nombreAdjuntoConExtension  , %FilePath_Absolute | %FilePath_Relative, &nombreAdjuntoConExtension, "Descripción del Adjunto" , "", "");
   
5) Enviamos el mail, como nos devuelve un valor de retorno tenemos dos formas de hacerlo.
  • If &eMail.Send() = %ObEmail_Delivered then
  • Local integer &i_ret = &eMail.Send();

Si el retorno del método es 1, salió todo bárbaro... sino... a revisar!

Número
Constante de Retorno
Descripción
0
%ObEmail_ FailedBeforeSending
El correo falló antes de ser enviado
1
%ObEmail_Delivered
El correo se envió correctamente
2
%ObEmail_NotDelivered
No se pudo entregar el correo.
3
%ObEmail_PartiallyDelivered
El correo se entregó pero no a TODOS los destinatarios.
-1
%ObEmail_ SentButResultUnknown
Se envió el correo, pero se desconoce si fue entregado.
Para mas detalles de la clase, pueden simplemente ver los books relacionados al tema en el siguiente link:
http://docs.oracle.com/cd/E41633_01/pt853pbh1/eng/pt/tpcr/task_MCFOutboundEmailClass-f451c6.html

Espero que este simple Paso a Paso les resulte tan útil como a mí.

Saludos.
Facundo Salerno.

sábado, 17 de enero de 2015

Using JavaScript to print a PeopleSoft Page

When working with Peoplesoft more than once we need/want to print the page we are working with.

Unfortunately, until a few time ago, I only knew one way to do that: printing the page throug the web Browser option.
But this method adds the navigation bar and menu to the printing page. I think these things are, at least, unnecesary.

With some simple steps we will see a new way of printing the page content, and avoid showing those unwanted sectors.

Let's have a practical example:

1) We have the Purchase Order page we have seen in the previous blog.


2) We will add an HTML area, based on a LONG type field.


3) We also add a push button to print the page. In this case, we will change some usual options.


This field must have a minimum of 25 characters, since we need to populate it with a string. I have chosen the DESCR field, in stead of a PRINT button field.

The target must be an External Link since we won't execute a FieldChange event. We are going to run a script in an external page.

The external link must be set as Dynamic, since we are generating it through PeopleCode.

We also set a Page Field Name property, in case we want to manipulat it through the HTML code.


Just to let the page having sense, we change the field label.


4) Here we have the final page in the Designer.


5) Set up the fields by PeopleCode.


In the RowInit Event we set the HTMLAREA field as well as the DESCR field.

The script we must set in the button to be run is  "javascript:window.print();"

On the other side, I will explain HTLMAREA value step by step.

a) <style type=""text/css"">
b)    @media print {
c)            #PAGEBAR, .PSHEADERTOOLBARFRAME {
d)                    display: none }
e)      }
f) </style>

a) Open a style tag, specifying CSS language will be used.
b) Specify this style will only be used when Printing the document.
c) Choose those HTML elements in the document that will be set up with the properties. In this case #PAGEBAR and .PSHEADERTOOLBARFRAME are the navigation bar and page header used by PeopleSoft pages.
d) Set display property to none, meanning these properties won't be shown in the printing document.
e) Close the "@media" key.
f) Close the "style" tag.

6) We navigate to the page in PeopleSoft.


7) When clicking the print button, the event is executed


8) The printed page will be shown as follows:


9) In addition to this step by step, we could also hide the "Print" button when printing the page, adding the #PRINT ID to the CSS script, in the RowInit event.


If we print it once again, the Print button is not shown anymore.


I hope this blog could be so useful to you as it is to  me.
Regards.
Facundo Salerno.

Usar JavaScript para imprimir una página


A la hora de usar PeopleSoft mas de una vez necesitamos/queremos imprimir la página en la que estamos trabajando.

Lamentablemente, a la hora de hacerlo, la única forma conocida por mi (hasta hace poco tiempo) es imprimir la página desde el navegador.
Pero a la hora de hacerlo nos incluye en la impresión el menú lateral y/o superior.
Esto puede ser molesto, o al menos innecesario.

Con unos simples pasos, veremos la forma de imprimir el contenido de una página, sin mostrar esos sectores indeseados.

Veamos un ejemplo práctico:

1) Tenemos la página de pedidos que hemos usado en el ejemplo anterior:


2) Vamos a agregar un área HTML, asignándole un campo LONG


3) Agregamos un botón para imprimir la página con ciertas especificaciones distintas a las usuales:


El campo tiene que tener un mínimo de 25 caracteres de largo, por lo cual uso el campo DESCR, en lugar de un campo de botón común.
El destino va a ser un link Externo, porque no se trata de un evento FieldChange, sino que queremos ejecutar un script en una página ventana a la nuestra.
El link va a ser dinámico, ya que lo generaremos por PCode.

Además, le damosun nombre a nivel de página al campo, por si queremos encontrarlo" y utilizarlo desde el HTML.


Para darle sentido a la página le cambiamos la etiqueta al campo.


4) La página nos quedaría de la siguiente forma:


5) Cargamos el script en el campo HTMLAREA:


En este evento cargamos tanto el valor del HTMLAREA, como el valor del botón.

El botón lleva el script a ejecutar: javascript:window.print();


En cambio, el contenido del HTML será entonces línea por línea: 
a) <style type=""text/css""> 
b)    @media print { 
c)            #PAGEBAR, .PSHEADERTOOLBARFRAME { 
d)                    display: none }
e)      }
f) </style>

a) Abro el tag de estilos, indicando que usaré CSS
b) Especifico para que tipo de salida es el estilo, aclarando que es solo a la hora de imprimir.
c) Elijo que elementos del HTML usarán la propiedad siguiente, en este caso #PAGEBAR y .PSHEADERTOOLBARFRAME son la barra de navegación y el encabezado propio de las páginas de PeopleSoft.
d) le pido que la propiedad display tenga un estado "none", es decir, no se mostrarán y cierro la llave de la propiedad
e) cierro la llave del tipo de salida.
f) cierro el tag de estilo.


6) Entramos a la página desde el sistema:


7) Al darle clic al botón, se ejecuta el evento ingresado:


8) Y la impresión resultante, queda de la siguiente manera:


9) Por último, podríamos también ocultar el botón "Imprimir" agregándolo a las propiedades del CSS.
Para hacerlo entonces, basta agregar la propiedad en el RowInit:


Le anteponemos el # porque así es como se indica el ID del Campo en el CSS.

Si ahora volvemos a imprimir, el campo ya no aparece en la impresión.


Espero que este simple Paso a Paso les resulte tan útil como a mí.

Saludos.
Facundo Salerno.


domingo, 4 de enero de 2015

Add a JAVA applet in a PeopleSoft Page


A JAVA applet is a set of related classes and compiled into a ".jar" file. This file is able to be run through an HTML object.

In PeopleSoft we cun add these programs in our pages through some easy steps.

Let's see an example:
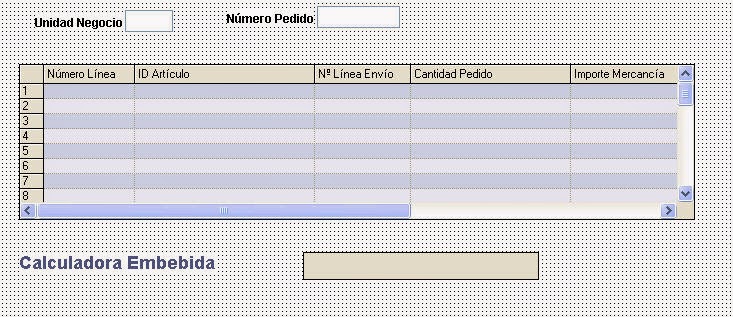
For instance, we have a page where we can see a purchase order's lines. We want to show a calculator in case any user wants to make some calculations based on the numbers in the page.


1) Place the ".jar" applet file in a public folder of the Web Server. We need this folder to be public since users must have access to the file.
For instance, we can place the file in the folder were the "Signon.html" file is placed.
Generally the path is:
//server/PS_HOME/WEBSERVER/BASE/application/peoplesoft/PORTAL/portalName


2) Add a HTMLAREA field in the page where we want to show the Embedded Calculator.


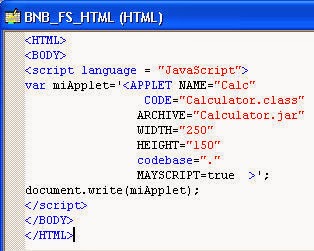
3) Create an HTML object. It will be used to populate the area in the page.


We are interested on the following parameters of this file:
NAME:Applet's name.
CODE: Path and name of the applet's main class.
ARCHIVE: Name and extension of the JAR file we left in the WebServer.
WIDTH: of the applet (pixels)
HEIGHT: of the applet (pixels)
CODEBASE: Here we should detail the path where the file is placed. Since we left it in the same folder as the singon.html file we only need to set the dot character "." as a parameter. With this reference we tell the system the file is in the same path.

Then we use the "document.write()" method to write the applet in the HMTL.

Note: Line breaks were only added to be shown in the explanation of the parameters. In the HTML object the applet must be written in the same line, so the final quote is recognized and the string is closed.


4) Populate the HTMLAREA field in the Activate event of the Page.


5) Finally, the result is as follows:


I hope this blog could be so useful to you as it is to  me.
Regards.
Facundo Salerno.

Agregar un applet de JAVA en una página PeopleSoft


Un applet de JAVA es un conjunto de clases relacionadas y compiladas en un archivo con extensión ".jar" que se puede ejecutar desde un HTML. 
En PeopleSoft podemos usar estos programas desde nuestras páginas, mediante unos simples pasos.

Vamos a verlo en un Ejemplo Práctico. 
Por ejemplo, tenemos una página donde se muestran las líneas de un pedido, y queremos insertar una calculadora para que el usuario pueda hacer cuentas en base a los números en pantalla.


Los pasos serían:

1) Ubicar el archivo .jar del applet en una carpeta del servidor Web que tenga acceso público. Esto es porque los distintos navegadores de los usuarios van a tener que poder acceder a dicho archivo.
Por ejemplo podemos dejarlos en el directorio del WebServer donde se encuentra el archivo signon.html 

Generalmente la ruta es: //servidor/PS_HOME/WEBSERVER/BASE/application/peoplesoft/PORTAL/nombrePortal

Ejemplo:


2) Agregar un área HTML en la página donde queremos visualizar el applet.


3) Crear un objeto HTML, que será el que se mostrará en la página.


De este archivo nos interesan los siguientes parámetros:
NAME: Nombre para el Applet.
CODE: Dirección donde está la clase principal del applet.
ARCHIVE: Es el archivo JAR que dejamos en el servidor.
WIDTH: Ancho del applet (en pixeles).
HEIGHT: Alto del applet (en pixeles).
CODEBASE: Aquí debe ir la ruta donde debe buscar el archivo. Como la dejamos en la misma carpeta del signon.html, basta con pasarle un caracter punto "." como parámetro, haciendo referencia a que el archivo JAR está en la misma dirección.

Con el método "document.write()" escribiremos en el HTML el applet.

NOTA: Los saltos de línea fueron agregados para la explicación, pero en el objeto HTML el applet debe ir todo en la misma línea, para que reconozca la comilla simple al final de la línea y cierre el "string".

4) En el evento Activate de la página populamos el campo HTMLAREA con nuestro script.


5) Finalmente, al entrar a nuestra página, el resultado será el siguiente:


Espero que este simple paso a paso les resulte útil como a mí.

Saludos.
Facundo Salerno.